
How to Photograph Garments for a Fashion School Portfolio With Your Phone
A phone can record the exact stitch that makes your jacket interesting and still make the finished garment hard to understand. Often the problem is where you stood. A window behind a black jacket can turn its front into one dark shape. Holding the camera high and tilting down can make the shoulders look substantial and the hem look tiny. In both cases, moving the phone or the garment can recover information that an hour of editing cannot.
This guide is for photographing garments for a fashion school portfolio at home or in a school studio. Work through it with one garment before setting up your whole collection. You will make a clear overall view, photograph the back, find a detail worth enlarging and keep an inside view where the brief calls for one. The setup drawing and lighting comparisons are editorial simulations. Use them to plan a test with your own phone, your own garment and the light you actually have.
Begin with a shot list for the school and the garment
Write the exact program and entry term at the top of a sheet. Copy the types of views you are responsible for into your own checklist. For example, FIT’s Fall 2027 Fashion Design AAS sewing section calls for photographs of two machine-sewn garments, including front, back and inside views, with up to eight photographs in the section. A lovely image of the collar cannot take the place of a missing required view. Other programs have different briefs. Check the instructions before you decide how many pictures to take or combine. FIT’s current Fashion Design AAS brief
Add a second column titled “what this photograph must show.” For a pleated skirt, the front could explain the spacing and fall of the pleats. The back could reveal that the waistband closes off center. For a lined jacket, the inside view can show how the facing meets the lining. Find one feature that would be hard to understand from the overall shot. That gives you a purpose for a closer photograph and a way to decide when you have enough images.
Put the list beside the camera. Leave a small space for the file name of the first usable take. If a classmate is modeling after school, get every required overall view before either of you spends fifteen minutes arranging one cuff. You can return to a close detail on a dress form later if the brief allows it. Once your model has left, replacing a missing back view with the same light and fit may require a second afternoon.
Find the light before you arrange the room
Walk the garment toward a window and turn it slowly. Watch the most difficult area, such as the lapel of a black jacket or a row of white gathers. Face the garment toward the window, then turn it about a quarter turn. Light traveling across the surface can give a seam a visible edge. If direct sun cuts a hard stripe across the torso, move out of the stripe or choose a period when the window gives softer light. Begin with one main light source so you can understand what it is doing.
Check for competing color. A window on one side and a warm ceiling lamp on the other can give the left and right sleeves different colors in the same frame. Try a shot with the room lamp off and compare the cloth with the actual garment. A brightly painted wall can also put a color cast on pale fabric. If moving rooms is impractical, try placing a large neutral sheet or board just outside the frame on that side and compare another shot.
You do not need to buy a reflector for a first test. A piece of white board opposite the window can return some light into the shadow side. Move it closer and farther away while somebody watches the screen. With a dark jacket, enough returned light can reveal the facing. Too much can flatten the texture that made you choose side light in the first place. Take one picture with the board and one without. Decide by inspecting the actual seam you want the reader to see.
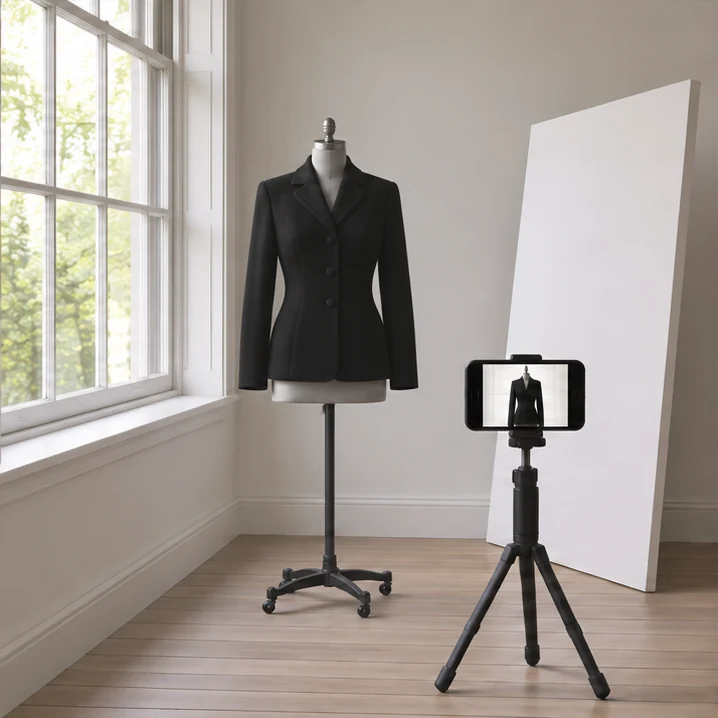
Give the garment enough space around it
Choose a background that separates the outline of the clothing from the room. Medium gray or a quiet neutral wall is a practical starting point for both light and dark fabric. A black dress against a black curtain can lose its edges. A white blouse against a brilliant white wall can lose the distinction between sleeve and empty space. Move the form away from the wall if you can. A little separation can make a cast shadow less intrusive and give you room to move around the garment.
Check all four edges of the frame. A wall outlet next to the hem can become the highest-contrast object in the photograph. A door molding crossing the shoulder line can make a sleeve look oddly bent. Move the setup a few inches, change the angle of the whole arrangement or hang a clean, plain backdrop. If you use a sheet, pull it smooth enough that a deep crease does not compete with the garment’s seam. An uncomplicated room is helpful because the viewer can read what you made.
For a long garment in a small bedroom, try opening the door and placing the phone in the doorway. Set the form farther inside the room and check that the doorway itself stays outside the frame. Shooting a little farther back with the standard camera often gives more believable proportions than switching to the ultra-wide lens from a foot away. If the room still forces an awkward view, book a quiet corner of the art room for the required full-length photographs.
Set the phone height for the view you need
Start with the standard rear camera and a clean lens. For a jacket on a form, put the phone near the vertical midpoint of the garment and hold it level. For a full-length look, step back enough to keep the whole silhouette in frame without tilting steeply. A level window frame or the edge of a door can help you notice a lean. Compare the garment in the room with the screen. If the shoulder balloons or the shoes shrink implausibly, test the camera position before blaming the pattern.
Use the phone’s regular photo mode as a baseline. Portrait or background-blur modes can cut away fringe, mistake a sleeve opening for background, or blur the fine edge of a veil. A beauty filter can smooth skin and the adjacent knit texture in one operation. Check the actual saved file because some processing appears only after the picture is taken. For admissions documentation, the texture and shape of the work are part of the evidence.
Support the phone steadily. A tripod is convenient, but a stable shelf and a timer can work if the phone is secured and the height is right. Mark the camera and form positions with removable pieces of tape where permitted. Mark individual feet of the form stand or the direction the wearer faces. Small marks make it possible to rotate the garment without drifting closer to the camera between photographs. A matched view helps another person judge how the back relates to the front.
Dress the form or model the way the garment was designed to be worn
Before photographing, empty pockets, straighten the garment on the shoulders and fasten what the wearer would normally fasten. Check whether the size of the form supports the neckline or creates a gap the garment does not have on its intended wearer. A fitted top on a form two sizes too small will communicate a misleading idea about fit. If possible, choose a person or form closer to the intended dimensions and note relevant context in the description.
Watch the wearer breathe, stand and move naturally for a moment. A student taking a front view might ask the model to stand like a mannequin and accidentally pull the shoulder blades together. The jacket then looks tight across a place where it normally fits. Start with a relaxed posture, weight balanced and hands clear of important details. Give one small direction at a time. If the aim is to show a pocket in use, take the clean front view first and the hand-in-pocket view afterward.
Prepare the garment as you intend it to be seen. Remove lint from a dark sleeve and press a seam only when the material and intended finish allow it. Deliberate creasing, raw edges or fraying can be important to the design. Make one overall and one detail that allow those intentions to read. Ask a model’s permission before using their photographs, especially for public sharing. When the head contributes nothing and the school permits it, a carefully chosen crop can keep attention on the garment.
Solve the black-jacket problem with a two-frame experiment
Take the first picture of the black jacket with the window behind the form. Look at the notch of the lapel, the front closure and the seam where the sleeve joins the body. The camera may preserve the brightness of the window and lose distinctions across the front of the jacket. You can sometimes brighten the whole photograph afterward, but brightening a very dark file can reveal noise while leaving the construction hard to see. Save the test picture so you can compare the effect directly.
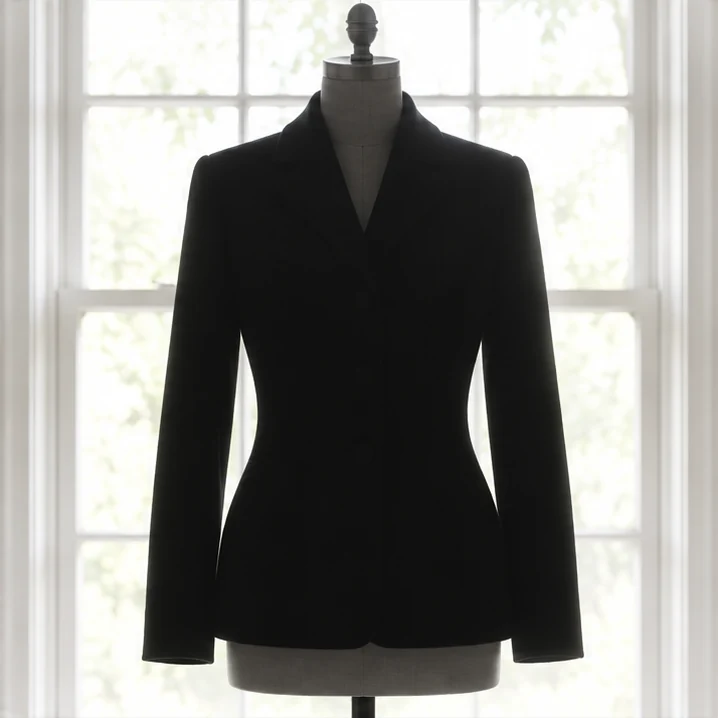
For the second picture, place the window to one side and give the jacket a neutral background. Leave the phone height and distance as similar as the room allows. On many phones, tapping the jacket sets a focus or exposure target. If your camera offers a brightness control, adjust it a little and inspect the cloth against the original. The goal is a jacket that still reads as black, with enough variation to distinguish the lapel edge, shoulder and front panels.
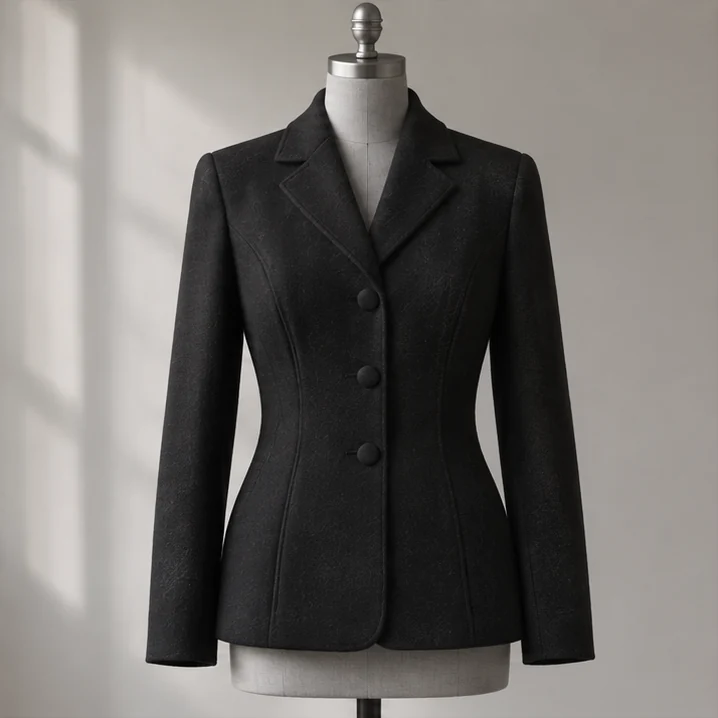
Put the saved frames side by side. Look at them once at ordinary viewing size and once close up. Can you distinguish the front panels without making the dark jacket look charcoal gray? Does the sleeve retain texture? Does the bright side lose all detail at the shoulder? If the second image solves one problem and creates another, move the white board before changing the exposure again. Working through one variable at a time gives you a setup you can reproduce for the back view.
Make the back and inside views do real work
Turn the garment and check the styling again. A back vent may catch on a stand. A collar can roll up as a wearer turns. Straighten only what would normally settle that way and check that the hem has enough space around it. Compare the height of the garment in the front and back frames. If the back is noticeably larger because you stepped closer, the reader may infer a difference in proportion that belongs to the photograph. Aim for an easy visual comparison.
For the inside view, start by deciding which area needs context. A close-up of a seam allowance with no recognizable landmark can feel like a photograph of a strip of fabric. Include enough of the adjacent lapel, waistband, pocket or armhole to locate it. Then take a closer version if the finish deserves it. For a brief requiring an inside view, follow its instructions on presentation and check whether the image actually shows the interior the reader was asked to inspect.
Think about how to support the garment without hiding the construction. A jacket opened gently on the form may show the relationship between lining and facing. A close sample can show the method used to finish a seam. Those images answer different questions. If the inside is unfinished, photograph its current state for a working review and label it accurately. For the final application, allow enough time to finish the work you claim as finished and to document it again afterward.
Handle white fabric, print, shine and sheer layers
For white-on-white stitching, examine the brightest areas before you move on. If the seam vanishes into a white patch with no visible surface, reduce the exposure slightly or shift the light across the stitching. Compare several test frames. The successful picture should retain the lightness of the cloth as well as the ridge of the seam. A photographic solution that makes an ivory blouse look gray creates a different problem for the reader.
With a print, step back first and see the motif at garment scale. A large leaf repeated across a coat does something different from a two-inch close-up of the fabric. Next, choose a construction point where the print changes direction, crosses a seam or disappears into a fold. That second view can explain an intentional placement choice. If a tiny repeating pattern vibrates or forms strange bands on the screen, change the camera distance slightly and inspect the saved image at the size you plan to submit.
For satin, metallic surfaces or sequins, move the light relative to the camera until the highlights describe the surface without covering it in glaring white patches. A slight turn of the wearer can move a reflection away from a closure. For a sheer layer, try a background that reveals the edge and the overlap. Check whether the underlayer belongs to the designed look. Tell the reader which elements you made if the styling includes a purchased slip or a borrowed garment.
Crop and export without rewriting the garment
Make a copy of the original before you edit. Straighten a tilted frame, crop an intruding edge and make modest exposure or color corrections that bring the file closer to the garment you saw. Preserve the original proportions. Stretching a photograph vertically to make a figure look taller also lengthens the jacket, alters the button spacing and changes the relationship between sleeve and shoulder. A reviewer assessing fit needs the garment’s actual shape.
Zoom in to check sharpness at the important point, then return to ordinary viewing size. A close view can appear impressively detailed when magnified on your phone and become an unreadable patch when placed next to six other images on a slide. If the school permits multiple views, test the exported slide as a whole. If it specifies individual uploads, prepare those files individually. Parsons reminds applicants that the initial computer-screen review places a premium on clear, legible images. Parsons guidance on documenting work
Give each export a useful name that connects it to the physical garment and view. Keep the untouched originals in one folder and school-specific exports in another. Check the program’s current size and file-type limits and open the exported file from the folder you actually plan to upload. If a file is too large, export a smaller copy and inspect the seam again. Sending the image through a messaging app can strip detail or change compression in ways you discover too late.
Check the photographs as a set
Arrange your candidate front, back, inside and detail views on one screen, even if the school asks you to upload them separately. Imagine the four frames represent a single garment for sale in a studio archive. Would a reader think one image showed navy and another showed brown? Does the hem rise an inch between views because the model adjusted the waistband? A contact sheet gives you an inexpensive way to spot differences that disappear when each file fills the screen.
Pay particular attention to the transition from a full view to a detail. The viewer should be able to find that detail again when they look back at the full garment. A collar point, row of buttons or side seam makes a useful landmark. A very tight rectangle of blue stitching on blue fabric can belong almost anywhere. If you love the close view, keep it and take one slightly wider frame. Compare the two with somebody who has never seen the garment in person.
Finally, check the file on a laptop or another available screen with night or warm-color settings turned off if possible. Consumer screens differ, so use this as a gross-error check. If a black jacket is readable only when your own phone is at maximum brightness, the image may have little margin for a different display. Return to the original, compare it with the garment and choose the best honest rendition before final export.
A thirty-minute reshoot when the deadline is close
Use the first five minutes to find the single most important failure in the existing set. A missing back view comes ahead of a slightly imperfect crop on an otherwise readable front. A blurred construction detail deserves a reshoot if the stitch or fastening is central to the work. Put the phone, garment and shot list together before you begin. Choose a simple setup you can reproduce and clear the distracting objects inside the frame.
Spend the next fifteen minutes making the required view and a controlled alternative. Take the straightforward picture first. Change one thing, such as the light angle or camera distance, and take another. If you still have time, make the detail while the garment and light are in the same positions. The remaining ten minutes belong to review and export. A photograph you have not opened at normal display size is still only a candidate.
Ask a fresh reader three questions. Which way does the garment open? Where does its outline sit away from the body? What can you learn about how it was made? Adapt those questions to the piece you actually designed. If the reader can point to the answers, the photographs have done their job. If they admire the atmosphere but cannot find the sleeve seam you spent hours refining, you now know exactly which frame to remake.
For help choosing between a finished view and a fitting detail, see the portfolio before-and-after demonstration. If you are assembling work for a specific program, consult the FIT Fashion Design AAS guide and your current official brief. If you would like a second reader for a draft sequence, see what Helen reviews in two private rounds.