
How to Build a Fashion Design Portfolio in High School
You can start a fashion design portfolio in high school with a garment you already own, something to draw with, and a question about the way clothes work. A pocket you cannot reach when you carry a bag is a perfectly good place to begin. By the time you have tried three placements, watched somebody use them and drawn the change, you have something more interesting to show than a page of outfits drawn from memory. You have made a decision, and a stranger can see how you reached it.
This guide takes you from that first observation to a small set of pages you can discuss with a teacher or portfolio reviewer. The overshirt in the illustrations is an editorial teaching example. Choose a problem from your own life and make your own work. At the end you will have one project, a way to start a second, and a clearer idea of which skills you need to practice before applying.
Start with the clothes you actually live in
Look at the garment you wore most often last week. Turn it over, put it on, sit down in it, and try the thing you usually do while wearing it. A sleeve might ride up when you play an instrument. A uniform skirt might twist when you carry a heavy bag on one side. A jacket might look beautifully simple on its hanger and make you empty your hands just to undo the fastening. Write down the moment when you noticed the problem. That small piece of observation gives a project an owner and a reason to exist.
You can also start with delight. Perhaps the lining of a coat flashes orange only when you walk, or the crease in a pair of trousers stays sharp down to the knee and then breaks into soft folds. Draw what interests you before you decide what you want to make. An observation about color, memory or movement can lead to as much design work as a practical inconvenience. The test is whether you can go back and look again when your first idea feels obvious.
Set up a single sheet for this first visit. Give the garment a rough front and back drawing, circle one area, and write a question next to it. Record one fact you can verify by looking and one thing you still need to learn. “The bag strap crosses the pocket opening” belongs in the first column. “Would a higher pocket still work when I sit?” belongs in the second. Keep the date. This is already useful material for a sketchbook.
Read one college brief before you make a shopping list
Start a short list of programs and look up the instructions for your exact intended degree, entry term and applicant type. Save the official link beside the date you checked it. Some programs invite a range of visual work. Others set specific fashion drawing and construction assignments. An exercise that helps you learn can earn a place in your sketchbook even when it cannot fulfill a school requirement. Making that distinction early saves time and materials. Compare the U.S. fashion programs in the school guide.
Make a working sheet with three columns. In the first, write the school’s deliverable in your own words. In the second, name a piece of your existing work that could satisfy it. In the third, identify what you still need to produce. If the school asks for a back view and you have only a front drawing, you have a small, well-defined task. If it asks for garments you have sewn and you have drawings alone, you need time in front of a machine. Those gaps demand different calendars.
Give yourself permission to leave boxes empty. A sophomore exploring fashion has a different job from a senior submitting next month. The sophomore can try two materials and discover which one invites more work. The senior needs to know whether the required views exist and whether the files open. Keep your working sheet private. The reader of your final portfolio needs the strongest evidence of your thinking, while you need an honest picture of everything it took to get there.
A weekend project you can finish at a kitchen table
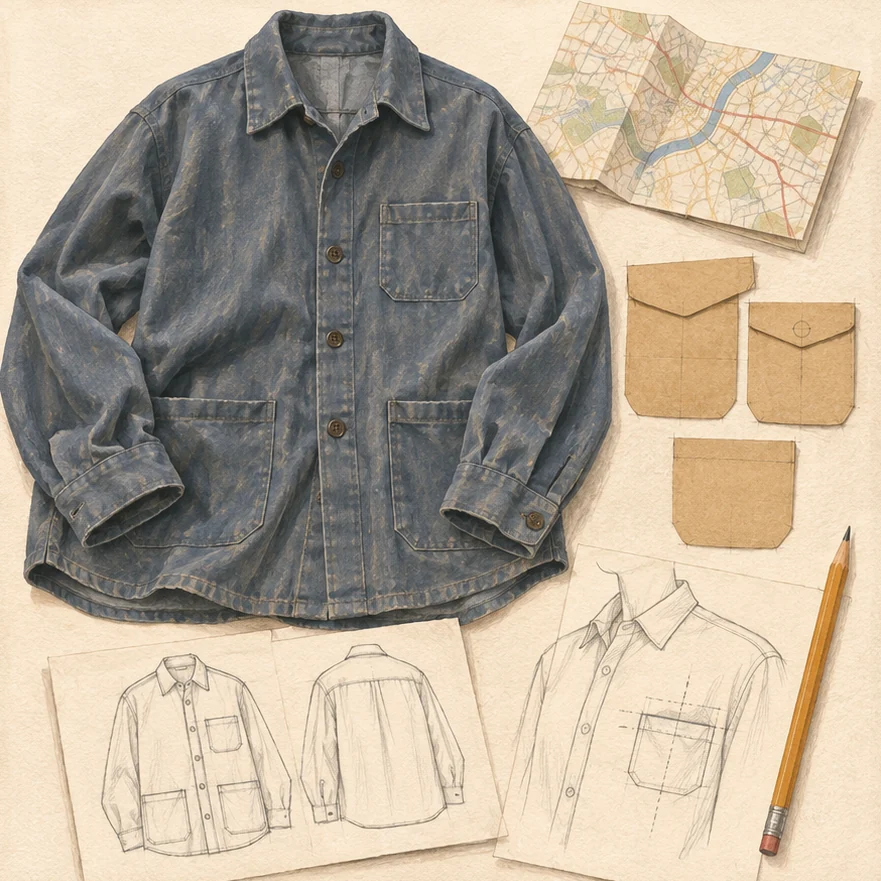
For the overshirt exercise, gather an old shirt you have permission to use, scrap paper, a ruler, a pencil and a few pieces of removable tape. Find a card roughly the size of a transit pass. If you test with an actual card, turn its printed side away from the camera. Add a bag you regularly carry. Set the garment on the table and sketch where each pocket opening sits in relation to a stable landmark such as the center front or the hem.
On Saturday morning, put the shirt and bag on and reach for the card with one hand. Look down once, then try again while looking ahead. Where does your wrist bend? Which part of the bag do you move out of the way? Can you return the card as easily as you removed it? Make two quick drawings of the hand in different positions. A helper can take a picture while you make the movement. Tell the helper exactly which part of the action you want in the frame.
Cut three paper pockets with different openings. One could be high and straight, one lower and angled, and one nearer the side seam. Test them against the shirt using removable tape, off the body first. Try to change one feature at a time in your next round. If you change both depth and angle, you may like the result without knowing which change helped. Number the paper pieces and save them, including the version you would never want to wear.
On Sunday, choose the version worth a fabric test. Paper is helpful for locating the opening, but it cannot tell you whether a soft pocket mouth will collapse. Fold a scrap twice to simulate a finished edge. Hand-baste the scrap to a spare panel or practice shirt if you can. Compare drawing and test piece under similar conditions. You may learn that your favorite angled line works when the shirt is buttoned and shifts under the load of a card when the shirt hangs open. That is a result you can design from.
Draw alternatives someone could actually distinguish
A page of twelve near-identical figures makes it hard to tell what you tried. Begin with three small drawings of the same garment outline. Keep the scale and viewpoint steady. Change a structural choice on each one. A narrow vertical opening lets the hand enter from the side. A flap protects the contents but introduces another movement. A bellows pocket adds depth and can interrupt the clean line you originally liked. Label each drawing with the question it raises. Draw the back if the change affects the way the garment hangs there.
When you struggle to draw a body, step down a level of difficulty. Place the garment flat and draw the outline of its panels. Draw the hand separately, at a larger scale, holding the object the pocket must fit. Then draw the meeting point between the two. You can learn to draw figures alongside this exercise. For any school assignment that specifies how figures must be drawn, follow its original-work rules and complete that assignment yourself.
Try switching the order in which you draw. Begin one sketch with the pocket opening, then build a plausible garment around it. Begin another with the shoulder line and work down. Compare the drawings. The first may exaggerate a small feature and give you an unfamiliar silhouette. The second may reveal that your interesting pocket has nowhere comfortable to sit. Write down which parts you would borrow from each. That sentence makes the next iteration easier to start.
Learn something specific from the fabric
If you have never bought fabric, begin with two scraps that behave differently in your hands. An old woven pillowcase and part of a worn knit T-shirt can tell you a great deal. Cut comparable samples from material you are free to use. Hold their top corners, hang them, fold them into a pocket, and slip the same card inside. Look for where the edge stretches, where the corners curl and whether the surface shows a line of stitching. Photograph the samples together while the difference is visible.
Record exactly what you know. A label may tell you the fiber content of a donor garment. When you have no label, describe the observable behavior and record the content as unknown in your working notes. For an application that asks for verified fabric identification, choose a swatch whose composition you can establish. Guessing “silk” because something looks shiny makes a straightforward materials exercise needlessly unreliable.
A student with sewing experience can take the same test further. Make one opening with an extra layer of reinforcement and another without. Sew both with the same seam allowance and treat the upper corners the same way. Load each pocket for a short time. When you put the samples side by side, describe the difference with a verb. One edge rolls forward. One stays level. Those observations are more useful than calling one fabric luxurious or one finish professional.
Photograph the point at which your idea changed
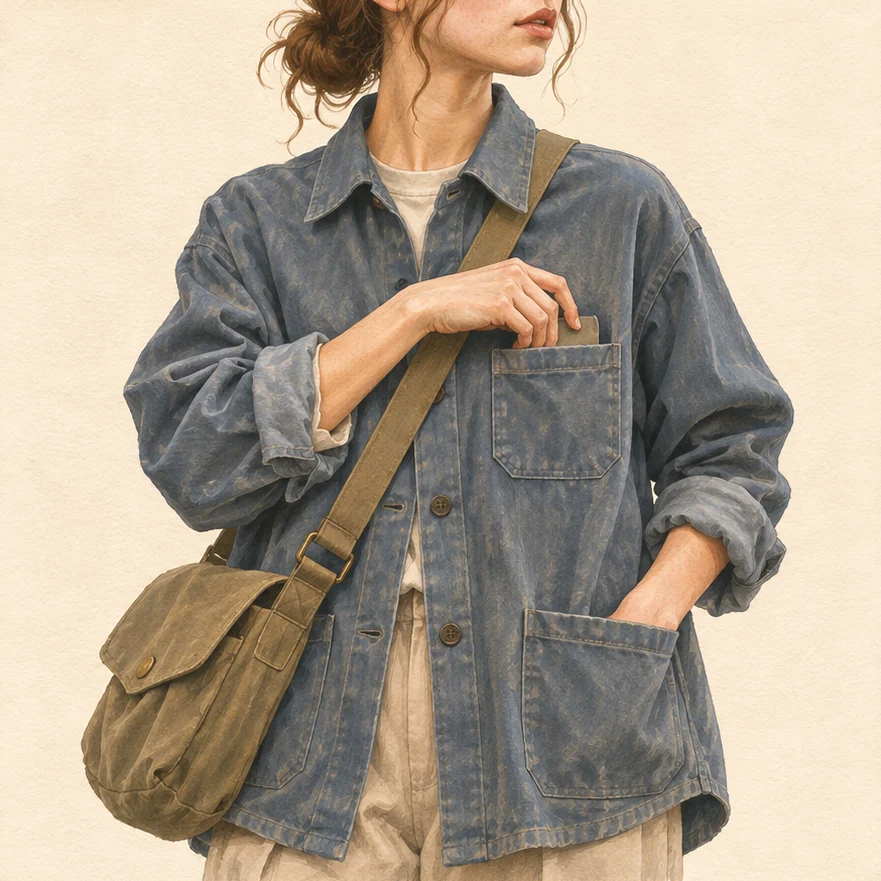
Decide what you want each photograph to establish before you press the shutter. A full view explains where the pocket belongs on the body. A close view can show whether a hand clears the strap. A photograph of the flat paper pattern explains the angle but cannot show access when the garment is worn. Give each candidate photograph a job. If two pictures do the same job, keep the one with the clearest gesture and the least distracting background.
Save a record before you unpick or move a test piece. Put a clean sheet behind a small sample, hold the phone square to the work, and leave some room around the edges. Write a note beside the file name while the test is fresh. “Lowered opening after wrist caught on strap” will mean something in a month. A camera roll containing six hundred files called IMG followed by four digits will make you reconstruct the project from memory just when you want to be editing it.
Missing the first photograph is common. You can still draw a diagram of what happened and label it as a later reconstruction. Keep the actual sample if you have it. In a portfolio conversation, being able to say exactly which part you observed and which part you reconstructed shows more care than a staged shot that quietly pretends to be contemporaneous. For a practical camera workflow, use the phone guide to photographing garments.
Turn the work into three readable pages
For a practice edit, spread everything out and give yourself three pages. On the first, introduce the garment and the situation. On the second, show the alternatives and the test that changed your mind. On the third, show the selected design at a scale that lets someone judge it. Three pages is a useful editing constraint for this exercise. Your school’s brief determines the actual number and format you will submit.
Read the first page from across the table. Can a visitor see what the object is and where attention belongs? Now cover the written explanation on the middle page. Can you still make out a difference between the tests? On the last page, ask whether the view shows the part that originally troubled you. A beautifully drawn front view can leave the hand, strap and opening just outside the frame. In that case a new photograph will do more than a better adjective in your caption.
Think of captions as the part of the story only the maker knows. The viewer can see that a shirt is blue. They cannot see that lowering the pocket let you reach the card while carrying a tote. Try a working sentence with three parts: the first choice, what happened in use, and the change you made. Cut anything the picture already says. Put explanations in the application fields where the school requests them. Keep the editable page file so a school-specific export takes minutes.
Build a second project that reveals a different skill
After you finish the overshirt study, resist the urge to reproduce it in five colors just to increase your page count. Spread the pages out and write what a reader can already tell about you. They may see that you notice practical details, test your assumptions and communicate construction. What would they still be curious about? Perhaps they have never seen your sense of color, the way you draw from life, or what you do with fabric when a body moves through it.
Choose one of those questions for the next project. If the first was a careful pocket experiment, the next could start with a memory of the lining in a family coat. Draw its color against three surfaces in the room. Fold a strip of lining inside a scrap sleeve and film how much appears when you bend the elbow. The two projects can belong to the same designer because both arise from close attention. They do not have to belong to the same collection.
If you already take an art class, look for work that carries your point of view even though it started as an assignment. Note what the teacher assigned, what you independently chose, and what you revised. If you collaborated in a theater costume shop, record which pattern pieces, fittings or finishes you handled. Ask permission before publishing someone else’s image. A clear account of a small contribution gives a reviewer a fairer reading of your abilities than a vague credit for a whole production.
If your school has no fashion classes
Turn an ordinary school resource into one specific studio opportunity. An art teacher may be able to help you see proportions in a drawing. A theater director may know when a costume can be examined offstage. A librarian can point you toward images of clothes in the period you are researching. Ask a small, concrete question and bring something with you. A teacher who has never taught fashion can still tell you whether the drawing on the page resembles the object on the table.
You can practice a good deal with a needle, scrap material and paper. Make a sample large enough to fold around your own forearm. Mark where the paper buckles when you bend your elbow. Cut a second version with room at that point and compare the two shapes laid flat. Photograph the samples and your drawing of the movement. This is a useful, honest project even if the first cut tears. Where a school requires machine sewing, record that requirement separately and arrange access early enough to learn and practice.
Keep a running list of what you can do independently and what requires a resource you need to book. Put photographing your sketchbook and cutting paper tests in the first group. Put a supervised machine session and a fitting on a borrowed form in the second. That small distinction turns a vague complaint about equipment into a realistic sequence for the next two Saturdays.
Fit the work around a high school week
Reserve one longer block for making and two short ones for looking. In twenty minutes after school you can draw the garment you wore or sort yesterday’s photographs. In a longer weekend block you can make a sample, test it and photograph the result before taking it apart. If your only sewing machine is at school, arrive with the pieces already cut and a written question. Use access to equipment for the decision that actually requires it.
A parent can be a helpful second pair of hands. Ask them to hold the phone level, turn a dress form or read a page without explanation. Give them a question with an observable answer: “Where does your eye go first?” or “Which image shows the difference between the openings?” Leave choosing, making and writing with the student. An adult’s first impression is useful precisely because they do not already know the answer.
When the earliest deadline approaches, count backward from a complete practice upload. Reserve time to check each image at its submitted size and to read the official brief again. A photographer, teacher or friend may become unavailable the week you need them. A sensible plan leaves at least one task you can complete independently in each session. Put the last missing garment view ahead of redesigning a cover. The cover is easy to revisit once the evidence is in hand.
Decide when you are ready for feedback
Bring a draft when a second reader can help you choose between real alternatives. Two paper samples, a drawing and a question about pocket placement can support an excellent conversation with an art teacher. For a more extensive review, assemble several projects, their working pages and the current instructions for your target programs. Identify the decision you are stuck on. You will get more specific feedback by asking which view demonstrates the fit adjustment than by asking if the whole portfolio is good.
Try this final check with a classmate who has never seen the project. Give them one minute with the pages, then take the pages away. Ask what the wearer needed, which idea changed, and what evidence they remember. Write down their actual words. If they remember the blue shirt but miss the bag strap, you have learned exactly where the edit needs attention. You can fix a missing relationship with one well-chosen image.
Start your next studio session by laying out the three things you kept: the observation, the test and the choice it led to. That is a manageable beginning even if your deadline is a year away. Students who want another short exercise can visit Portfolio Notes. If you already have a draft and are deciding what to revise, see how the two-round private portfolio review works.