
A Fashion Portfolio Before and After: What Changes Between Two Reviews?
Put two images of the olive rain cape side by side. In the first, you can read the length, the hood and the way the shoulder layer falls. In the second, you see the same cape in profile. It makes a convincing pair until you ask one small question: what happens when the wearer reaches forward? Both arms are resting. The portfolio page describes a garment designed around movement and gives the reader two views of someone standing still.
This fashion portfolio review before-and-after is a studio demonstration. The cape and fitting studies are AI-generated editorial illustrations made for this article. The two layouts show a real edit of those same illustration assets. They depict a hypothetical project, rather than a client session or an admissions result. You can do the exercise with your own drawings or photographs. Start with a page you like well enough that removing anything feels slightly uncomfortable.
First look at the draft
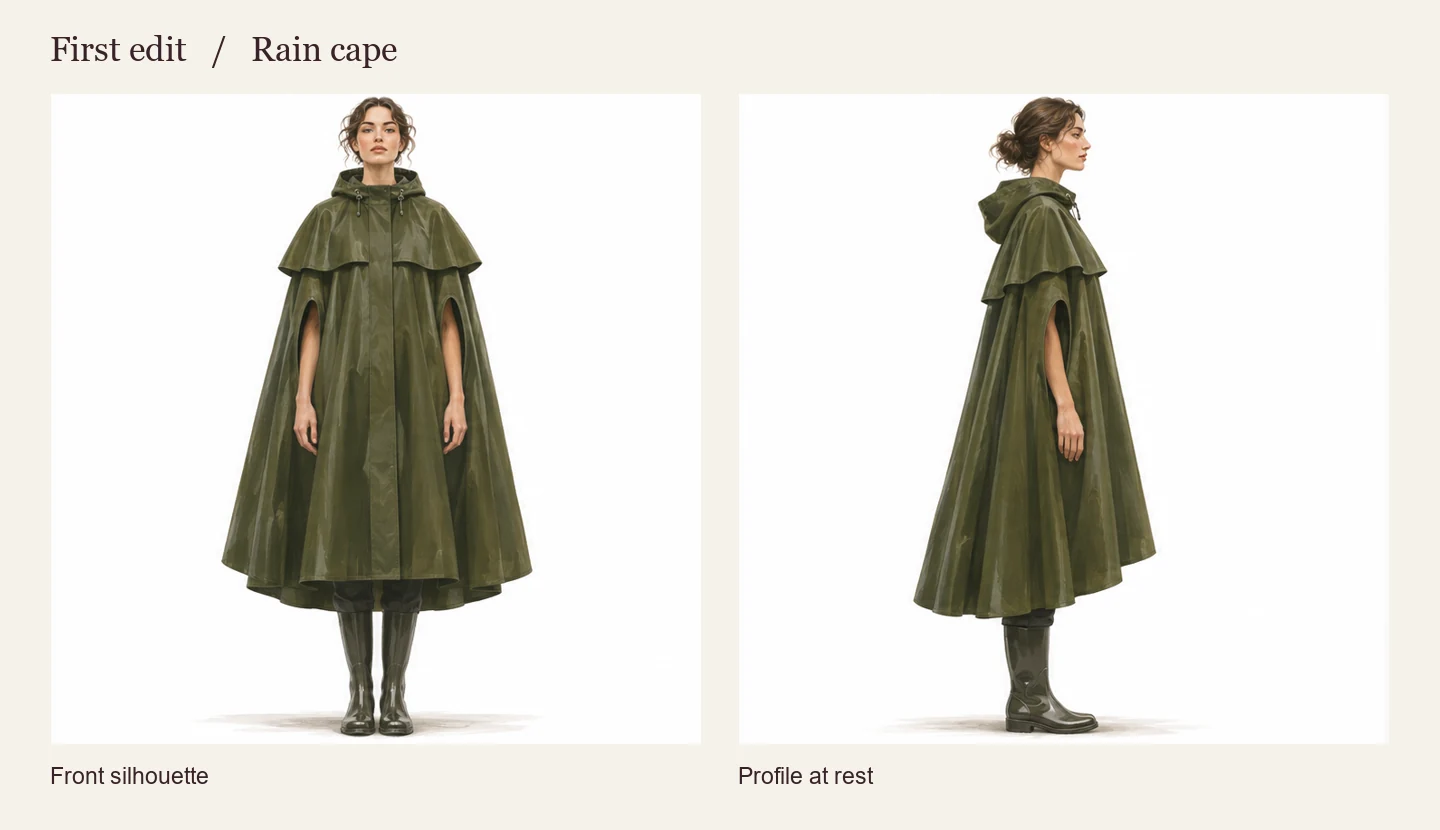
Give the first layout a moment before reading further. Look for the largest shape. Can you tell where the hem falls in relation to the body? Does the profile tell you something about volume that the front hides? Think of two things you would keep. Then decide what question the page leaves unanswered. You may choose a different question from the one in this article. Good feedback starts by noticing which question the designer is trying to answer.
The draft has a sound reason for existing. A full front view shows the relation of the capelet to the long body. The profile reveals that the hem projects behind the leg. The repeated figure sets a scale, and an uncluttered background lets the eye follow the olive silhouette. None of those are errors. An edit that begins by declaring the entire draft weak misses the useful work already on the page. Write down those strengths before anyone opens editing software.
Now read a hypothetical line from the designer’s working notes: “I wanted the wearer to reach a door handle while the long front stayed close to the body.” Return to the pictures. Which one lets you check that claim? The side view could be essential for a designer concerned with the shape of the hem at rest. It is less useful proof for a designer asking what happens at the arm opening. The intention changes the value of the image without changing the quality of the drawing.
Round one begins with the designer’s question
Imagine that the first review begins with the student asking, “Which page looks more polished?” A reviewer can answer that, but it is a hard answer to use. A more productive question is, “Can you tell how I kept the hand free without lifting the whole cape?” The student has named a design problem, told the reader what to look for and created a way to check the next draft. That is an excellent question to bring even when the work still has visible flaws.
Write your question on a separate card and keep it face down while a classmate looks at the work. First ask them what they believe the page is about. Do they talk about coverage, volume, waterproofing, color, or the openings? Turn over the card and ask them to point to the best evidence for your stated intention. A long pause is valuable. It tells you that the image the designer has been seeing in their head may never have made it onto the page.
A reviewer also needs enough context to protect important material from a well-meant cut. Is the profile required by a school brief? Is the cape one item in a sewing submission? Is the page an independent project with freely chosen views? For this demonstration, assume it is an independent process page. We can move the profile to the working archive. For a prescribed submission, a required view stays in place and the editing question becomes where to add the missing evidence. Always put the brief on the table alongside the draft.
Identify the smallest useful change
A large list of suggestions can feel like good value until you sit down the next evening and cannot identify the first task. Begin with one decision capable of changing what the reader understands. Here it is to keep the front view and replace the second stationary pose with a fitting view of a bent arm. That change preserves the garment’s overall shape and makes the opening visible in use. A new typeface, palette or decorative border cannot supply the same information.
Set a test for the revision before you make it. After seeing the revised page, a reader should be able to point to where the arm exits the cape and explain why the opening deserves a close view. The test need not prove that the whole coat performs perfectly in rain. It asks only whether the edit communicates the decision in question. A portfolio page that silently claims a garment is weatherproof because it looks like rainwear would need much more evidence.
Notice the difference between a visual problem and a garment problem. A better crop may let us see an arm opening that already works. If the opening actually catches at the elbow, the maker needs a fitting and possibly a construction change. A photograph alone cannot free a restricted arm. Before acting on advice to “make it clearer,” decide whether your next hour belongs at the cutting table, beside a camera, or at the screen. The answer determines what kind of progress you can honestly show in round two.
Plan the missing view before taking anything apart
For a real cape, write a short shot request for a helper. Ask for the wearer in a relaxed stance, then slowly reaching forward with the same hand. Keep the front edge and the shoulder in frame. A useful photograph might catch the instant when the forearm lifts the lip of the opening. A very tight crop of stitching could be beautiful and still leave a reader unsure which part of the body they are seeing. Start slightly wider than you think you need.
If you still have your first fitting sample, compare it with the current version. Mark the position of an old line on a copy of a drawing or identify it on a labeled working photo. Keep the intact original. The distance between old and new openings means something only if the reader knows what problem the move addressed. Photograph a relevant moment of wear under comparable conditions. A change in pose, camera height and garment version all at once makes the cause of an improvement uncertain.
If you have already dismantled the fitting, you can still make a truthful page. Draw the two opening positions from your working notes and identify the sketch as a reconstruction. Or put the finished cape on and document what you can actually demonstrate today. A sentence such as “This later drawing records the adjustment I made at the fitting” is useful when it is true. Inventing exact measurements or presenting a restaged image as an original fitting adds certainty the project does not support.
Round two puts the fitting beside the silhouette
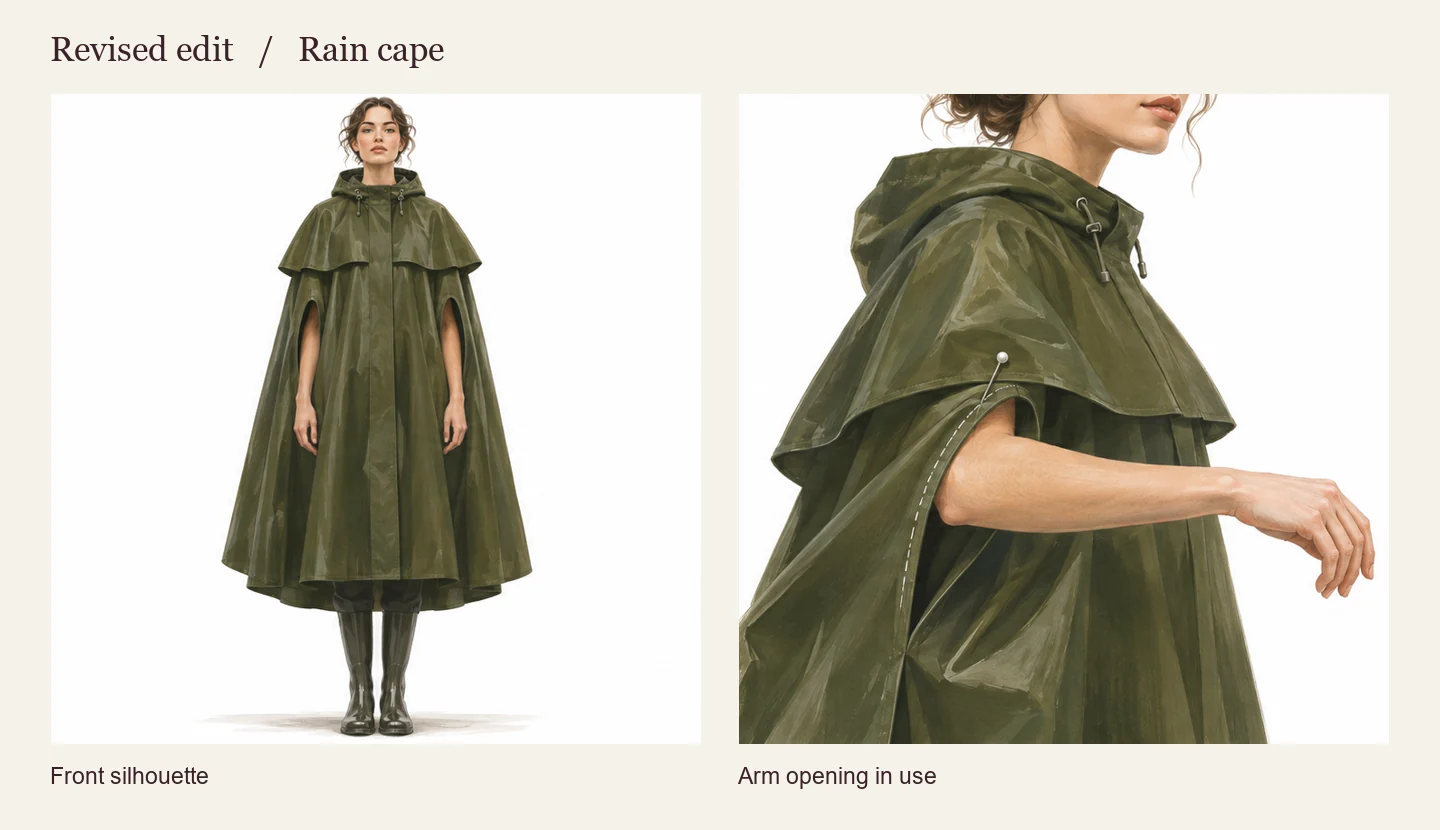
The revised layout retains the full front figure. Alongside it is a close view of an arm coming forward, a pin and a line at the edge of the opening. Start at the full garment, locate the arm opening and then move to the detail. That short visual journey explains where the detail belongs. Even if you do not know the name of a capelet, you can follow the change in scale and see what the designer was studying.
The revision also creates a new obligation. It is tempting to describe the pin as proof of exactly how many centimeters the opening moved or how much mobility improved. You cannot read either measurement from this illustration. A fair caption might say, “The fitting view isolates the opening as the arm reaches forward.” On a real project, the designer could add what they tested and what happened, provided they recorded it. Describing the image accurately earns more trust than a dramatic claim the image cannot establish.
Look for what the revision gives up. The profile in the first layout tells us more about back volume at rest. It could be worth restoring if the project expands into a second page about silhouette. Keeping that source file protects a genuinely useful observation. The version on the public-facing page can change with the question, the available space and the other work in the portfolio. Cutting something from a sequence is a choice about what a particular reader needs here. It has little to do with whether the work was worth making.
What a reviewer can hear in your explanation
In a private conversation, a student might describe the cape for two minutes and casually mention the most interesting observation just before moving on. “It opened easily when I was standing. I only noticed the pull when I reached for my bag.” That is an example of the kind of information a reviewer can help bring forward. It identifies the condition under which the design was tested. It also gives the next image a job. Your own most useful sentence may already be sitting in a voice memo or on the back of a pattern piece.
Try saying the project aloud in three short passes. First, describe the garment to someone who cannot see it. Second, describe what happened in the fitting. Third, explain what you still want to test. Record the three answers for yourself and listen for the moment you name an actual event. “I explored the interaction of form and function” is hard to picture. A hand caught, a fold flattened, a hem lifted or a pocket swung forward. Those verbs give a listener something to look for.
A student can reasonably disagree with a reviewer. Suppose the reviewer suggests cutting the profile, and the designer says the back length is the subject of the project. The next step is to check the rest of the page against that intention. Perhaps the profile should become the larger image, and the close detail should show how the back panel hangs as the wearer walks. A second review works best when students can articulate why they kept a choice. Agreement is an easy thing to measure and a poor substitute for understanding.
A small edit log worth keeping
Use a page of ordinary notebook paper. Write five headings across it: question, evidence in draft, change to test, result, next decision. For the cape, the first row might begin with access while reaching. The draft evidence is two standing views. The proposed change is a localized action detail. The result can be checked by a reader pointing to the opening. The remaining question might concern how far the front rises when the arm reaches higher. Each entry names something another person could check.
Make a second row for a suggestion you decide to postpone. Perhaps someone wants a full fabric story, including water resistance and the choice of lining. That would be interesting if the project concerns outdoor performance, but you may have no material test and only one slide left. Write “needs a separate material test” and carry on. This preserves the distinction between an idea that deserves a future project and a claim you can support in the current one.
A parent can help by asking a practical question at the end of the evening: “What changed since the first draft?” Give the student a chance to answer with the page in front of them. If the only answer is that the background is now a different shade, look again at the first review question. If the answer is that a reader can now see when the opening moves, you have a clear reason to keep the change. Save the earlier draft, too. Seeing the decisions side by side can be encouraging when the remaining work feels large.
Apply the same method to a piece without a sewn garment
Try a sketchbook sequence in which six fashion figures all show the front of a pleated skirt. Pick the figure that makes the silhouette easiest to understand. Ask what a reader still cannot learn. If the interesting part is the way the pleat disappears when the wearer sits down, draw that moment from observation or make a small folded sample and photograph it in two positions. A new sketch can address the missing evidence without requiring you to manufacture an entire garment for a practice review.
A textile project poses a different problem. A large, handsome photograph may show a surface covered in knots without revealing the scale or spacing. Try laying two small samples beside a recognizable garment feature, or pairing an overall view with a detail taken under the same light. The revision should allow the viewer to understand the behavior you intend to communicate. If your observation is about softness, a still image alone may say less than a short permitted movement study or a clear account of the specific test.
For an application with strict file limits, work through the same process on a paper contact sheet first. Write one sentence beneath each candidate describing the new information it contributes. Give each repeated contribution a matching pencil mark. The page with the most repetition suggests a possible replacement. Keep a separate line for required items so that an editing exercise never persuades you to drop a required angle, format or assignment. A strict brief changes the available moves, but you can still make each move count.
How to use two rounds without spending both on presentation
Schedule the first look while you can still change the work. Bring the current pages, the target briefs and two or three genuine decisions. A question about a missing photograph is productive if the garment is still available. If you borrow a dress form or rely on a friend to photograph the fitting, allow time between reviews for that dependency. A second meeting held before anything has been tried often repeats the first conversation in slightly different words.
Between rounds, choose changes by effort and consequence. A half-hour reshoot that reveals the construction of an original garment may matter more than an evening of polishing slide transitions. A difficult fitting may deserve the whole weekend if it affects the main premise. For each change, keep the old export and give the new one a clear version name. When the second review begins, open both. Reconstructing what changed from memory uses time you could spend looking carefully.
At the second look, return first to the question written in round one. Check the result before inviting new opinions. Then read the updated page within the full portfolio. An image that helped this project may repeat a movement study on the next slide. If the local improvement produces a new sequencing problem, you can often solve it by changing the order or size of a view. You are building a readable body of work, and sometimes the best outcome of two rounds is a shorter, calmer submission.
What if the revised page still confuses your reader?
Ask the reader to put a fingertip where the detail belongs on the full garment. If they point to the capelet hem when the crop actually shows the arm opening, you have found a problem of location. Make a wider crop from your original photograph so the edge of the shoulder layer and the opening are visible together. Test that change before adding a line of explanation. A well-placed landmark can solve the confusion even when the page is viewed from the other end of a table.
If they locate the opening correctly but cannot tell what changed, look at the gesture. A hand held at rest may hide the point of contact. On a real fitting, ask your helper to take several pictures as the elbow travels forward. Compare the moment immediately before contact with the moment the cloth starts to lift. Choose the frame in which a person unfamiliar with the pattern can see the cause. This is a different photographic task from making a graceful full-length portrait.
Occasionally the reader sees the change perfectly and asks why it matters. That is a caption problem. Name the everyday action or formal intention that made you care about it. Once each problem has a name, you can avoid rebuilding the whole page to fix a missing sentence or spending twenty minutes on a sentence to rescue the wrong photograph.
A last exercise before you ask for feedback
Pick a page and finish four sentences on scrap paper. “The decision I want you to see is …” “The image that currently shows it is …” “The part you still have to take on trust is …” “The smallest honest way I could show that part is …” Keep the answers plain. A student who writes “I need one photograph of the cuff buttoned around a bent wrist” has left the exercise with a task they can actually finish.
If you have no answer to the first sentence, spend the next hour with the garment or sketchbook. If you have answers to all four, try the edit and show the draft to someone who has never heard the story. Their ability to point to the change is a useful measure of progress. For a shorter version of this exercise, read the two-image sample critique. For help making the missing view, use the garment photography guide.
Helen’s $997 online review includes two rounds. In each, a student submits up to 15 portfolio items for a 30-minute narrated video review, followed by a 30-minute private virtual session. The student does the revising between rounds. If that rhythm fits the work on your table and the time before your deadline, see the private portfolio review details or check evening and weekend availability.